
How to add subtitles in iMovie on a Mac, iPhone or iPad
iMovie puts words on screen with titles. This guide shows how to turn a run of titles into readable captions on a Mac, iPhone or iPad, then style, time and export them.

In iMovie you add subtitles as titles: place a title where each line of speech starts, type the words, and set its length to match the line. A Mac lists the title styles under the Titles button over the browser; on an iPhone or iPad a title belongs to a clip, so you split the clip at each new line. When every line is in place, share the movie as a video file.
What iMovie uses for captions
Apple's iMovie guides describe one way to put words on screen: titles. You pick a title style, type your text into it, and place it over a video clip, a plain colour background or one of Apple's graphic or animated backgrounds.
Captions in iMovie are therefore a run of short titles, one for each line of speech, each timed to come and go with the speaker. The Mac steps here follow Apple's guide for iMovie 10.4.4, and the iPhone steps follow its guide for iMovie 3.0.6. Apple's article on adding text gives the same taps for iPhone and iPad.
Buttons can move between versions. If one is not where this guide says, check Apple's guide for the version on your device.
Prepare the words before you add titles
Typing captions one title at a time is slow, so do the writing first. Finish the edit too, so you are not chasing captions around after every cut.
- Write out what is said, in order, in a plain text document you can copy from.
- Break the text into short lines that can be read at a glance, with one thought per line.
- Play the video and note the time each line starts, so you can place every title in one pass.
Our guides to subtitle formatting rules and subtitle timing and reading speed cover how long a line should be and how long it should stay on screen. The same rules apply to titles used as captions.
Add and time caption titles on a Mac
Add a title for each line
- Put the playhead at the moment the first spoken line begins.
- Click the Titles button over the browser to list the title styles. When the movie uses a theme, that theme's own titles come first.
- Search the list by name, or move the pointer across a thumbnail to preview that style. For captions, choose a quiet style placed low; a large centred one looks like a heading.
- Double-click the style to put it at the playhead. To place it by hand instead, drag it onto the timeline over the clip that holds the line.
- In the viewer, double-click the sample words and replace them with what the speaker says.
- Click Apply, go to the next spoken line and do the same again.
Where you drop a dragged title sets its first length. Apple says a title dropped on the first or last third of a clip takes the length of that third, and one dropped in the middle runs the whole clip.
Set when each caption shows
Each title shows as a bar in the timeline, and its two ends decide when the words appear and leave. Line those ends up with the speech, not with the shots.
- Drag either edge of the title bar to start or end the caption earlier or later.
- For an exact length, select the title, click the Clip Information button and type a value in the Duration field.
- Drag the whole title bar to move the caption without changing its length.
- Snapping, in the View menu, makes title edges line up with clip and transition edges. Turn it off when a caption has to start in the middle of a shot.
Play each caption back with the sound on. A line that arrives late, or stays after the speaker has moved on, is easy to miss until you watch the whole movie.
Style the captions on a Mac
To change how a caption looks, double-click its title bar in the timeline. Above the viewer you can then pick the typeface and its size, align the text, colour it, and make it bold, italic or outlined. Show Fonts opens a larger font window. Click Apply to keep the changes.
To swap one style for another, put the playhead on the title, click Titles and double-click the new style. Apple says the new title keeps the length of the one it replaces, so your timing stays as it was.
For captions, keep the look the same on every line: one font, one size, one colour. An outline helps white text stay readable over bright or busy shots, and our guide to subtitle fonts and legibility goes deeper.
Add and time captions on an iPhone or iPad
On an iPhone or iPad, a title belongs to a clip in the timeline. Apple's article on adding text gives the same taps for both devices, and its iPhone guide adds the detail below.
Add a title to a clip
- In the project, select the clip that holds the line. Its inspector appears along the lower edge.
- Tap the Titles button, then tap the style you want.
- Select the placeholder words in the viewer and choose Edit. Replace them with the spoken line and close the keyboard with Done.
- To reposition the words, drag them in the viewer; to resize them, pinch.
- Open Style and choose Lower Third to set the text low in the frame, where captions go.
- Font and Color change the look, and More holds the Text Shadow and Uppercase switches.
A clip that carries a title shows a T icon in its upper-left corner in the timeline. Scan for clips without one to find a line you missed.
Split a clip for each new line
Since a title is tied to a clip, one clip holds one caption. To show a new line partway through a shot, split the clip where the next line starts and give each part its own title.
- Scroll the timeline so the playhead sits where the next line begins. Apple advises against splitting at the very start of a clip.
- Tap the clip, tap the Actions button, then tap Split. You can also tap the clip so it is outlined in yellow and swipe down over the playhead.
- Tap the new clip, add a title and type the next line.
- Under More, switch on Full Clip Duration. The line then stays on screen from the first frame of its clip to the last.
Apple says a split puts a None transition, a plain cut, between the two parts, so the video plays on as before. Use the yellow trim handles only to remove footage, because trimming shortens the video as well as the caption.
Can iMovie use an SRT or other caption file?
Apple's page on importing media from a Mac names three kinds of file iMovie brings in: video, photos and audio. None of the iMovie pages we read describe importing a caption file, so in iMovie the words go in as titles you type.
If you already have a caption file, Apple's other editor is Final Cut Pro. In iMovie on a Mac, choose File > Send Movie To Final Cut Pro, and Final Cut Pro opens with your project and its media in a new library. A trailer has to be converted to a movie before you can send it.
Apple's guide for Final Cut Pro 12.4 lists three caption file types it imports through File > Import > Closed Captions: CEA-608 (.scc), iTT (.itt) and SRT (.srt). The same guide describes Generate Captions, which writes subtitles from the speech in your clips. It needs a Mac with Apple silicon, works in U.S. English only, and downloads a language model the first time.
Export the captioned movie
On a Mac, select the movie in the browser and choose File > Share > File. Set the Format, Resolution, Quality and Compress menus, click Next, name the file and click Save. Apple notes that a 4K movie can go out at its native resolution, and the finished file opens in QuickTime Player.
On an iPhone, open the project, tap the Share button and tap Share Video. Tap Options to choose 1080p HD or 4K, plus the frame rate and HDR where your video offers them. Then tap Save Video to keep it in Photos, or Save to Files for a folder or iCloud Drive.
Watch the exported file from start to finish before you post it. A typo or a late line is quicker to fix while the project is still open.
When a browser caption editor fits
Typing titles works for a short clip with a few lines. For a long talk, speech in a language you do not type, or captions with a word-by-word look, a tool that writes the captions from the speech saves most of the typing.
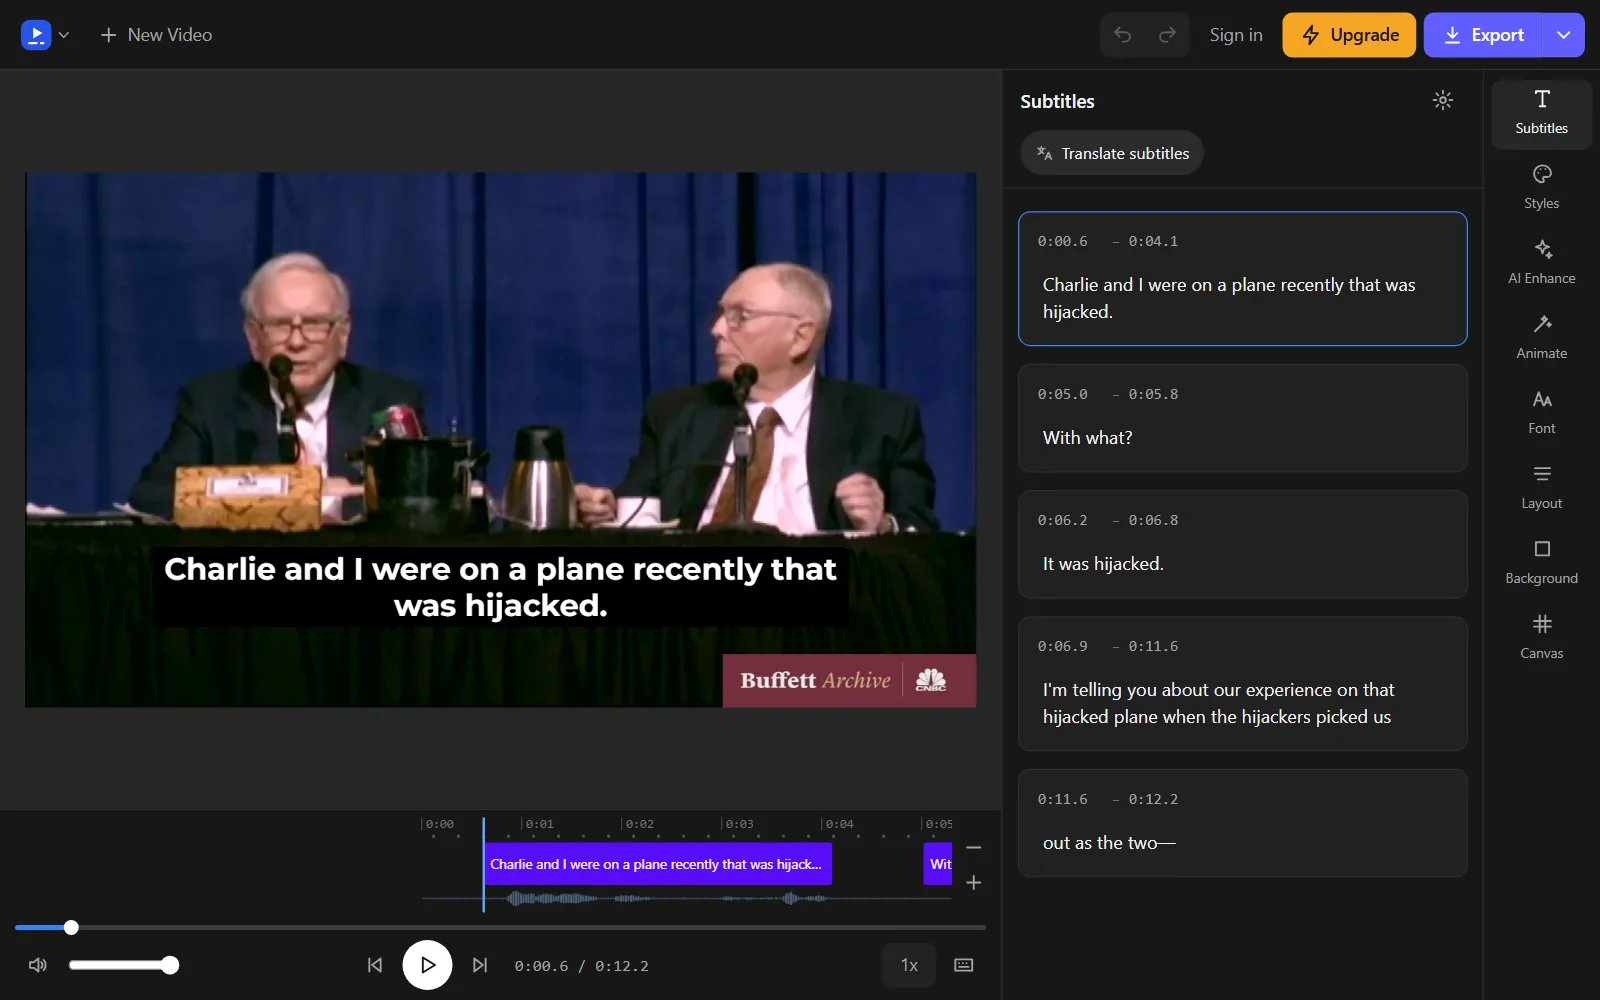
Vid Hub is one option, and it works on the file iMovie exports. Open vid-hub.com in the browser on a computer or a phone and add the video; the editor opens, and no account is needed to start.
- Choose the spoken language from over 90, or leave Auto Detect on. Vid Hub makes captions for up to 10 minutes of a video free, and paid plans caption up to 20 minutes of a video.
- Check each caption's text and timing in the caption list or, on a computer, on the timeline.
- Choose a look in the Styles panel, which holds 28 ready styles. If the words get lost over your footage, add an outline or a background box.
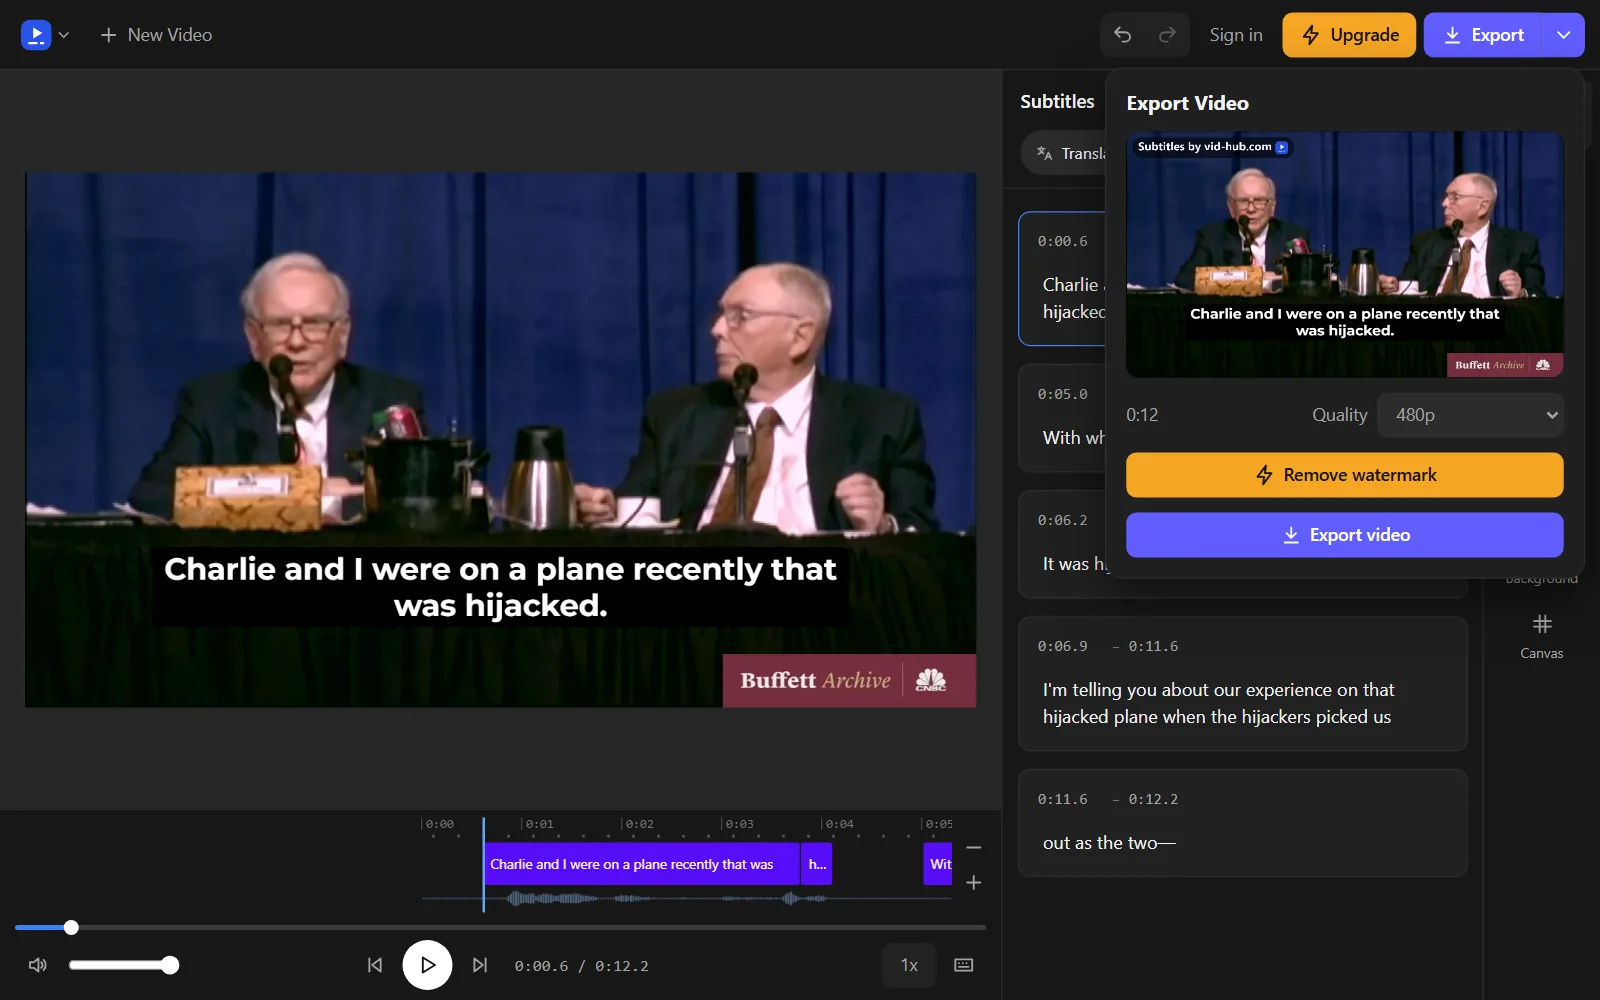
- Click Export. The MP4 shows the captions in every frame. The free export is 480p with a vid-hub.com mark, the Creator plan gives 720p with a small mark, and the Pro and Studio plans give 1080p with no mark.
Paid plans can also download .srt, .vtt or .txt caption files, from the arrow beside Export on a computer or the "..." button on a phone. Because iMovie imports video, you can also bring the captioned MP4 back into an iMovie project.
Frequently asked questions
Can iMovie make captions automatically?
Apple's iMovie guides for Mac and iPhone describe on-screen text as titles that you type and place yourself. If you want a first draft written from the speech, make it in another tool, then finish the video wherever suits you.
Why does a place name appear under my iMovie title on iPhone?
Some themes show the place where a clip was shot, such as a city name, below the title. Apple's iPhone guide covers how to change that location information on its own page.
How do I delete a title in iMovie?
On a Mac, click the title bar in the timeline so it shows a yellow border, then press Delete or choose Edit > Delete. On an iPhone or iPad, tap the clip, tap Titles and choose None.
Why can I not change the font of an iMovie title?
Apple notes that some theme titles and some animated titles do not let you change the font. Pick a different title style for your captions if you need to set the font yourself.
Why do my iMovie captions look blurry after I send the video by Messages?
iMovie on iPhone sends video through Mail and Messages at 360p and 30 frames per second, whatever the original was. Small caption text suffers most at that size, so save the movie at 1080p or 4K and share the saved file instead.
Can iMovie export captions as a separate file?
Apple's export page describes the Format menu as a choice between video with audio and audio only. For a separate caption file you need an editor that writes one; Final Cut Pro's guide, for example, has a page on exporting closed captions.
How long should each caption stay on screen?
Long enough to read the whole line without rushing, and not past the moment the speaker moves on. When a sentence is too long to read in that time, split it across two titles rather than shrinking the text.
Try it on your own video
Open the editor, add your video, and get captions you can edit, style and export.
Upload your videoNo account needed to start.



Sources
We read each page below on the date shown. Rules, prices and plans change, so check the page itself before you rely on it. A source we cite does not endorse Vid Hub.
- Apple Support: Add titles in iMovie on MacRead 2026-11-07.
- Apple Support: Modify titles in iMovie on MacRead 2026-11-07.
- Apple Support: Add text to your iMovie projectRead 2026-11-07.
- Apple Support: Add titles to a movie in iMovie on iPhoneRead 2026-11-07.
- Apple Support: Arrange video clips and photos in iMovie on iPhoneRead 2026-11-07.
- Apple Support: Import media into iMovie from your MacRead 2026-11-07.
- Apple Support: Send projects to Final Cut Pro from iMovie on MacRead 2026-11-07.
- Apple Support: Import closed captions into Final Cut Pro for MacRead 2026-11-07.
- Apple Support: Generate subtitles automatically in Final Cut Pro for MacRead 2026-11-07.
- Apple Support: Export a movie, trailer, or clip as a file in iMovie on MacRead 2026-11-07.
- Apple Support: Share your movie as a video file in iMovie on iPhoneRead 2026-11-07.