
How to add captions in Adobe Premiere Pro
Premiere Pro can transcribe a sequence and turn the transcript into a caption track. This guide follows Adobe's own pages, from the Text panel to the caption options at export.

Open the Text panel in Premiere Pro, click Transcribe sequence, then click Create captions to put a caption track on the timeline. Correct the words and timing, style the track in the Properties panel, and choose burned-in or sidecar captions on the Caption tab when you export.
How captions work in Premiere Pro
Premiere Pro makes captions from a transcript. Speech to Text writes down the dialogue in your sequence, and Premiere turns that transcript into a caption track on the timeline, timed to the speech.
Adobe's subtitles how-to advises adding captions once most of the editing is done. If you caption first and trim clips later, you end up retiming captions that no longer match the picture.
This guide follows Adobe's own pages: two Adobe Learn tutorials published in January 2026, the Speech to Text product page and the subtitles how-to. The tutorials do not give a version number, so a label in your copy may differ slightly. Adobe's product page calls the app simply Premiere.
Step 1: Transcribe the sequence
- Open the sequence you want to caption and go to the Text panel. If you cannot see it, open the Window menu and choose Text.
- Click Transcribe sequence and pick the audio track that carries the speech.
- Wait for the transcript to appear, then read it through. Click any part of the text to correct it.
Fix the transcript before you go further, because the captions are cut from it. A word you correct here comes out right in every caption that uses it.
You can also transcribe one clip at a time. Right-click the clip in the Project panel and choose Transcribe, or use the transcribe button in the Text panel.
Step 2: Create captions from the transcript
- In the Text panel, click Create captions.
- Choose a caption format and a style. Adobe's tutorial says the default works well for social media posts.
- Set how many lines of text a caption may use, then click Create captions to confirm.
Premiere adds a caption track to the timeline, with each caption lined up to the dialogue. The transcript itself is left as it was, so you can go back to it if you need to.
Step 3: Edit caption text and timing
Automatic captions still need a person to check them. Play the sequence with the sound on and watch each caption against the voice.
- Words: in the Text panel, go to Captions, pick the caption with the mistake and type over it.
- Timing: drag the handles at the start or end of a caption on the caption track. Expand the audio track so the waveform shows, and line each caption up with the voice.
- Missing lines: put the playhead where the line belongs, add a blank caption with the plus (+) icon in the Text panel, and type the words.
Keep each caption short enough to read in the time it is on screen. Our guide to subtitle timing and reading speed explains how long a line needs.
Step 4: Style the captions
Click the caption track in the timeline to select it, and its style settings show in the Properties panel. Adobe's January 2026 tutorials show these controls there.
- Font, size and colour of the caption text.
- Capitalization. The presenter in one tutorial switches the captions to all caps.
- Align tools to place the captions. The same tutorial raises them on vertical video.
- A background behind the text, with its own size and colour.
To keep a look, create a style in the Properties panel and give it a name. Then choose it under Track Style to apply it to the whole track. In Adobe's translation tutorial, one saved style updates every translated track together.
A plain font on a background holds up well over busy footage. Play the export on the kind of screen your viewers use. Our guide to subtitle fonts and legibility covers the choices in more depth.
Bring in captions from an SRT file
If a transcription service or another caption tool hands you an .srt file, you can import it instead of transcribing. Adobe treats it like any other piece of media.
- Drag the .srt file into the Project panel.
- Then place it in the sequence by dragging it out of the Project panel.
- Premiere builds a caption track that holds every caption in the file. Check the timing against the speech, then edit and style it as in steps 3 and 4.
An imported file only lines up if its times match your sequence. Caption the final cut, or an export of it, so the first caption starts at the right moment.
Export burned-in or sidecar captions
Captions leave Premiere in one of two main forms. Choose File > Export > Media, pick a format, then open the Caption tab and choose an option.
- With Burn Captions into Video, the text becomes part of every frame, and nobody watching can switch it off.
- Create Sidecar File exports a clean video and writes the caption text and timecodes to a separate file.
| Burn Captions into Video | Create Sidecar File | |
|---|---|---|
| What you get | One video file with the captions in the picture | A clean video plus a separate caption file |
| Can viewers hide them? | No, they are part of the image | Yes, viewers can hide the subtitles |
| Suited to | Feeds where people scroll with the sound off | Sites that take a caption file next to the video |
Burn the captions in for social feeds, and send a sidecar file where a platform asks for one. Our guide to burned-in vs soft subtitles goes further into the trade-off.
Another route: caption in Vid Hub and import the .srt
If you would rather write the captions outside Premiere, Vid Hub is a caption editor that runs in the browser at vid-hub.com, on a computer or a phone. You can start without an account.
- Export your finished sequence, open vid-hub.com and add the video file. The caption editor opens.
- Pick the spoken language from over 90, or leave Auto Detect on. Captions are written for up to 10 minutes of a video free, and up to 20 minutes on paid plans.
- Correct the text and timing of each caption in the caption list or, on a computer, on the timeline.
- On a paid plan, download the captions as an .srt file from the arrow beside Export on a computer, or from the ... button on a phone.
- Import the .srt into Premiere as described above, then style the track in the Properties panel.
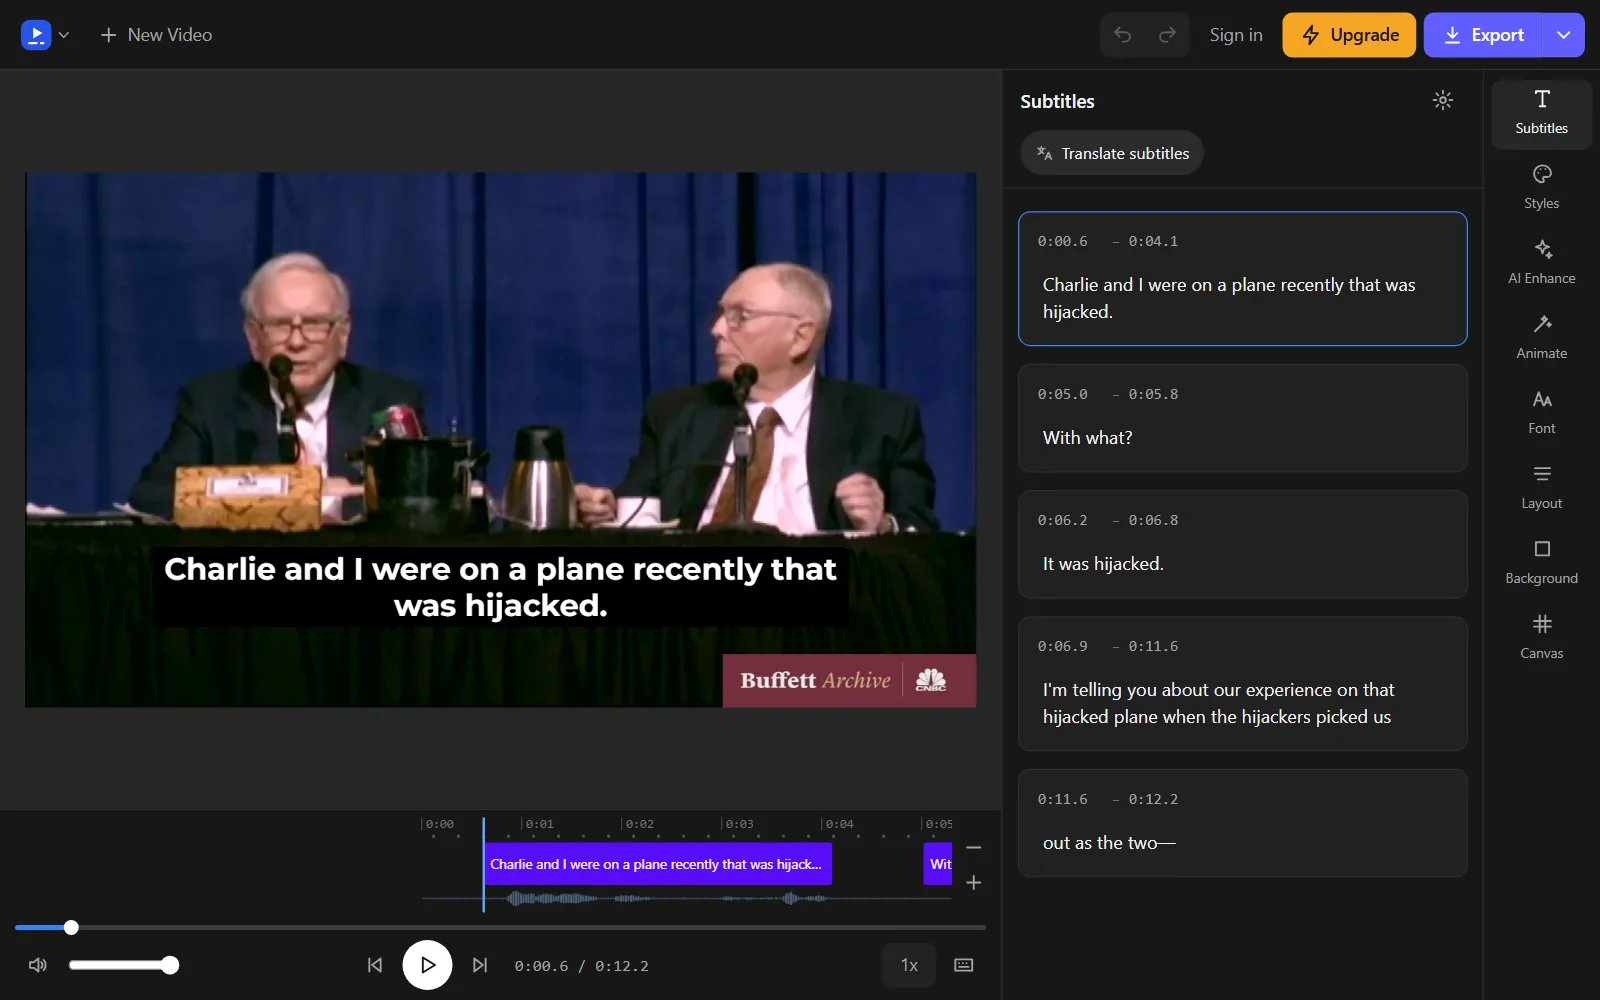
The editor shows the video with its captions on the canvas, next to the caption list where you fix each line. Because you captioned an export of the final cut, the times in the file match your sequence.
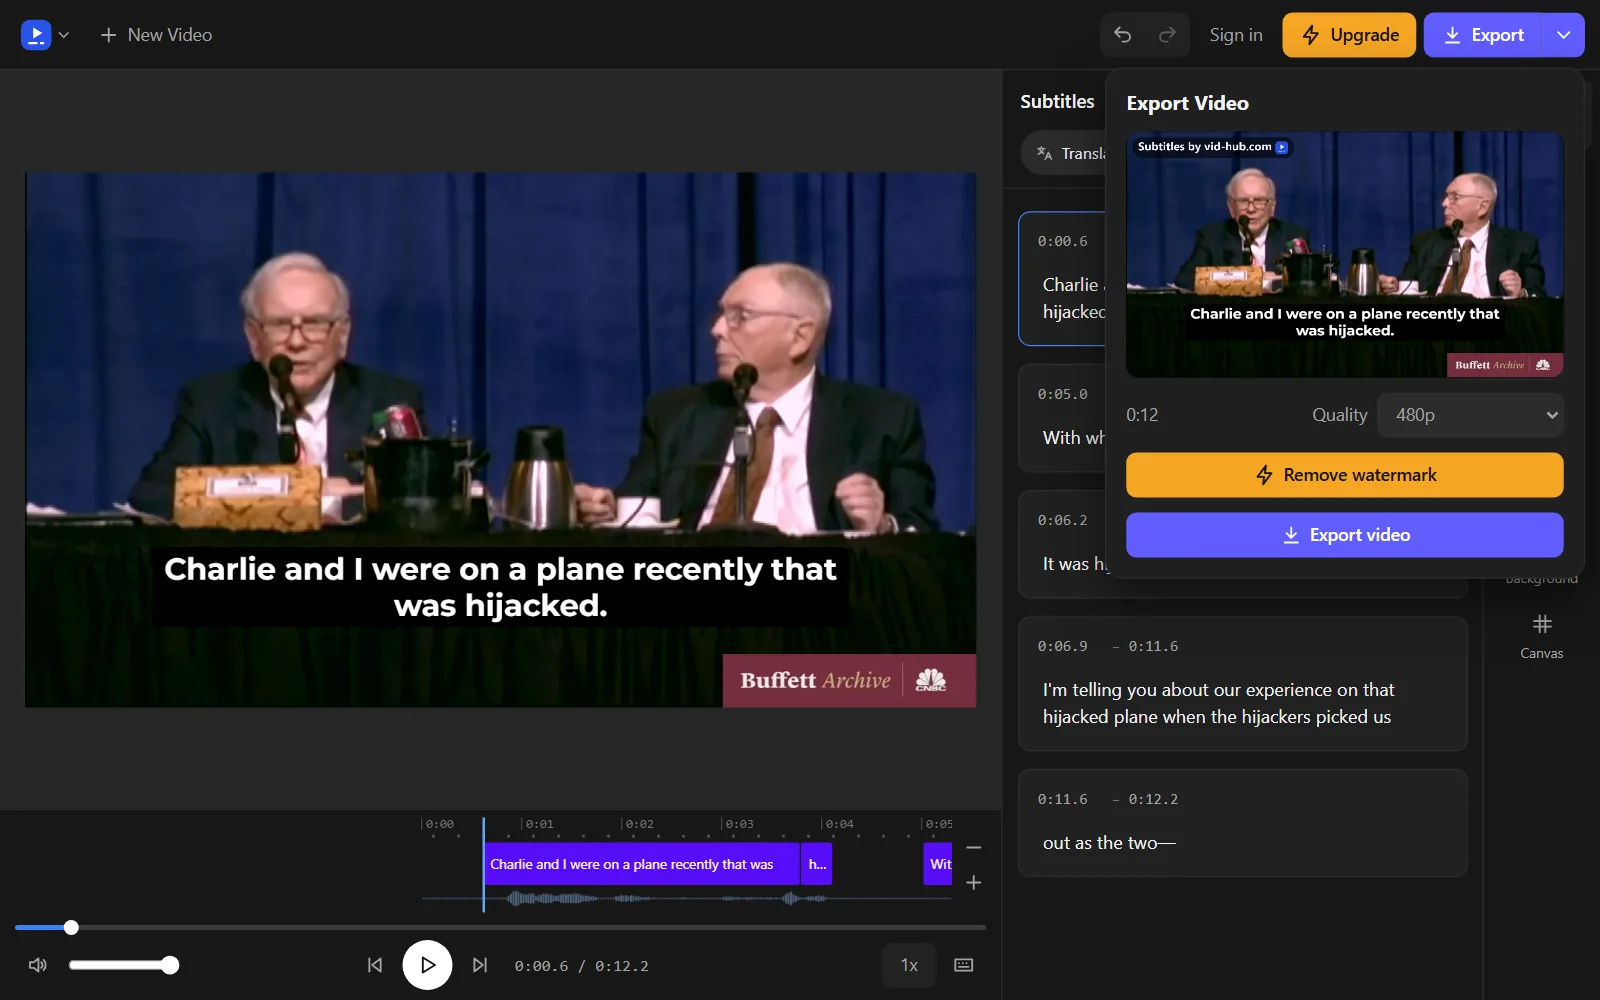
On a computer, the arrow beside Export holds the caption downloads: .srt, .vtt or .txt on paid plans. The Export button itself makes an MP4 with the captions burned in, if you would rather finish there.
Common problems
- Captions drift from the picture after more edits. They were made from an older cut, so transcribe the final sequence and create the captions again.
- The same mistake shows up in many captions. It most likely came from the transcript, so correct it there before you create captions, or fix each caption on the track.
- Captions are burned in when you wanted a file. In the export settings, open the Caption tab and choose Create Sidecar File instead of Burn Captions into Video.
- Only some captions changed style. Save the look as a style and apply it with Track Style, so the whole track follows it.
- Translated captions read badly. Adobe's tutorial stresses checking every translation before export, since you may not speak the language, so ask a fluent speaker to read each track.
- Captions hide behind on-screen buttons on vertical video. Raise them with the Align tools in the Properties panel, then play the export on a phone.
Frequently asked questions
Does Premiere Pro have automatic captions?
Yes. Adobe's Speech to Text feature uses AI to transcribe the dialogue, and its product page says the captions are placed to follow the pace of the speech. You still need to read them before you publish.
Can Premiere Pro transcribe without an internet connection?
Yes, from Premiere 22.2, according to Adobe. The app comes with an English language pack, and other languages are downloaded one pack at a time. Once a pack is installed, transcription in that language works offline.
Does Speech to Text cost extra in Premiere Pro?
Adobe says it does not, because Speech to Text comes with the Premiere subscription. Its product page adds that there is currently no fixed cap for reasonable use by individual subscribers on their own projects.
Can Premiere Pro translate captions?
Yes. Adobe's pages put a Translate Captions button in the Captions tab, and its January 2026 tutorial shows setting the source language and picking target languages there. Translation runs in the cloud, and each language arrives on its own caption track that you can show or hide.
Can Premiere transcribe clips automatically on import?
Yes. Adobe's product page points to an automatic transcription option in the import settings. Its newer tutorial shows clips with dialogue being transcribed as they come in once Auto Transcriptions is on.
Which broadcast caption formats can Premiere Pro export?
Adobe's Speech to Text page names SCC, MCC and STL among the broadcast caption formats it supports, and says captions can also be embedded in the video on export. Ask the broadcaster which format it expects before you deliver.
Can I reuse a caption style in other projects?
Adobe's product page says you can save your caption settings and use them as caption templates in other projects. The same page says captions can also be converted to graphics.
Try it on your own video
Open the editor, add your video, and get captions you can edit, style and export.
Upload your videoNo account needed to start.

Sources
We read each page below on the date shown. Rules, prices and plans change, so check the page itself before you rely on it. A source we cite does not endorse Vid Hub.
- Adobe Learn: Improve video accessibility using captioning toolsRead 2026-11-07.
- Adobe Learn: Automatically add and translate captionsRead 2026-11-07.
- Adobe: Transcribe video to text with AI (Premiere Speech to Text)Read 2026-11-07.
- Adobe: How to add subtitles to videoRead 2026-11-07.